

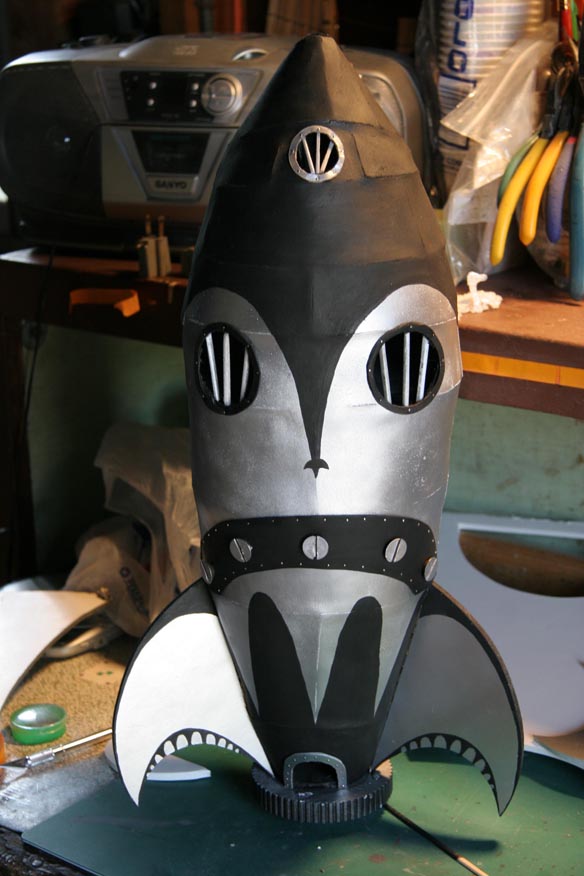
Old "rocket ship jungle gym" pieces like the one above, popular in playgrounds around the late 50's through the 60's, were the source of inspiration for the location of the climax in my film. I tried to base my design on the original so that it could still be identifiable as a "rocket ship jungle gym" but I also took liberties with the design for the functionality it needed to serve in the story.
Materials used: Foam board for the interior construction of the rocket and window frames, card stock construction paper for the curved surfaces, spackle for shaping and filling in seams, balsa wood for the bars in the windows, counter sink wood screws for the big bolts in front, push pins for the small rivets, and silver and flat black spray paint.
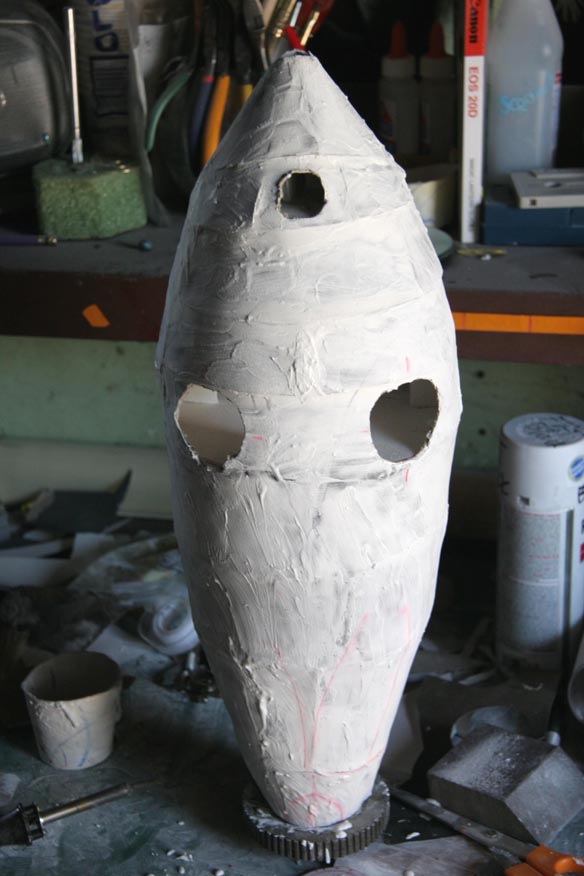
1. Translate graphite drawings to a working full scale schematic.

2. Construct honeycomb frame for card stock construction paper
to wraparound (based on schematic measurements).

3. Begin to fill in unwanted seams with spackle while using sand
paper to makes edges flush.

4. Paint with flat black to better identify imperfections in
construction then repeat spackle process.

5. Flat black paint application/spackle process repeated once more.
Window template measured for proper placement.

6. Watered down spackle applied to better identify small
imperfections.Windows cut out.
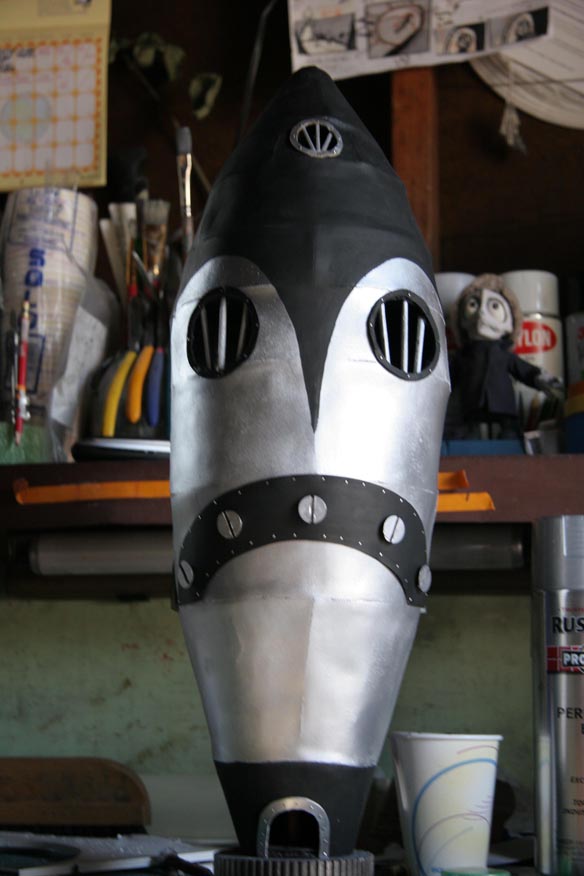
7. Final flat black paint applied to rocket.

8. Silver paint applied, window frames applied with push pins.

9. Bars in windows applied as well as "mouth piece" with screws and
additional "rivets."
10. Fins and final painting detail applied.
To be honest I didn't know if this process was going to work but I figured it would be worth a try. Planning definitely helped out as well as following the measurements on the schematic. If your trying to build something, or create anything for that matter, and you find yourself not really knowing where to start, just start with what you know. I knew what I wanted to build based off of my drawings and that informed the steps I took in the construction of the rocket.
Example: Fiddlesticks! I need my rocket to be round but what materials would allow me to do this? Foam board works well for solid rudimentary shapes and card stock construction paper would fit around the form while reinforcing the structure. Yeah that sounds good! But what about gaps? I want a smooth finish. Well spackle is sand-able, maybe I could work with that to get what I want...
Of course it wasn't that simple but this form of planning is an abbreviated version of what I had to think about when building the rocket and it definitely helps when exploring creatively uncharted territories.
-Fonz
wow. That looks like it took a lot of work. You said "start with what you know", what if I don't know anything about construction or design? what should I do?
ReplyDeletemr fonz. i love this blog. this has already inspired me to put up more posts about process, as opposed to just finished pieces of work. It's really exciting/intersting/radical/informational/horizon-broadening to see how you tackle fabrication challenges that I might've handled differently.
ReplyDeletequestion! did you intend for the internal skeleton of the rocket to kind of bulge out from beneath the cardstock, or was that a happy accident that resulted from the spackling shrinking the paper a bit? Either way, I'm glad it happened - it gives it a really good skeletal feel that probably wouldn't have ever happened if you were a fartbooger and made parts of your film in computer "3D."
also i love how you write. i imagine tony p. reading this and cracking up at the subtle fonzer tone that it all has. :D
Thanks Brian!
ReplyDeleteI think part of the bulging simply came from the placement of the card stock over the structure of the rocket. I wanted to mimic the pattern of metal paneling, much like how old WWII fighter planes were built. That's why I made that honeycomb interior so that the card-stock would have something circular to adhere to. The idea was to get the appearance of a curved surface through a series of angles.
So I think a combination of that, slight shrinkage and me trying to smooth out sets of panels, that overlapped each other, with additional spackle is what accentuated that look of the internal structure sort of bulging out. But your right it does look pretty skeletal which serves the story even better!