5/1/10

Brick by Brick


One of the materials that I've consistently been surprised with in terms of versatility in it's usage is foam. Using a fairly simple technique, I was able to create some realistic looking brick walls that definitely became useful during set construction.  


The type of foam I used for the walls are like the ones pictured above. It's a pretty common foam that can be generally found in most arts and craft stores. They come in a bunch of different shapes and sizes and since foam is a really easy material to shape your not limited in the range of things you can create.


The only two tools I used to create the bricks were a wooden sculpting tool and a makeup wedge.

 This was my process:
  1. Decide on what type of brick wall you want to create.
  2. Use the wooden tool, and a straight edge, to score the pattern into the foam.
  3. Give the foam a base coat of gray paint for the concrete, you can use a makeup wedge but a large paint brush is quicker for this step.
  4. Use the makeup wedge to add the final top coat of paint for the bricks. The imperfections in the paint coverage will reveal the undercoat nicely giving the natural illusion of the brick having multiple layers.
*DO NOT use solvent based spray paint on foam. It's corrosive to this material and will melt whatever beautiful creation you've made. Try using another type of paint like an acrylic, or Krylon H20 Latex spray paint as recommended by my good friend Brian Engh.


 Here's a detail of the first wall I made. You can see here how the gray undercoat really looks like concrete wedged between a bunch of red bricks. Another good thing about this type of foam is that it has a lot of rough texture that looks like rock. In stop-motion texture is a really good thing to try to incorporate into your set construction as much as you can. It make things look more realistic and much more imperfect, unless of course you story calls for something different where you want things to look very smooth and clean.


With the second wall I stuck with the base coat as an overall color but painted a few groups of bricks with the makeup wedge for variation. I wanted this wall to look like it was made out of cinder blocks as opposed to the red brick wall above.

Here are some roughly composited examples of how I ended up using the walls for the film. 


One quick word on using the right material for your story. As you might notice from the brick wall details above their textures are a little different. The red bricks are a little smoother and softer while the cinder blocks are more pitted and brittle. This was a happy little accident that happened mainly because I found these two unrelated pieces of foam in my garage. I didn't buy them at the same time so they weren't exactly identical in the way that they were made and I only realized this after finishing their construction. But it didn't ruin the shot in anyway, instead it greatly contributed to the right mood of the scene. The cinder blocks look more menacing and uninviting while the red bricks are a little more stable and peaceful. This made me realize that the choices of material you use to create an object can greatly inform it's character just as much as it's color or shape would. 

 -Al

4/3/10

Rocket Science


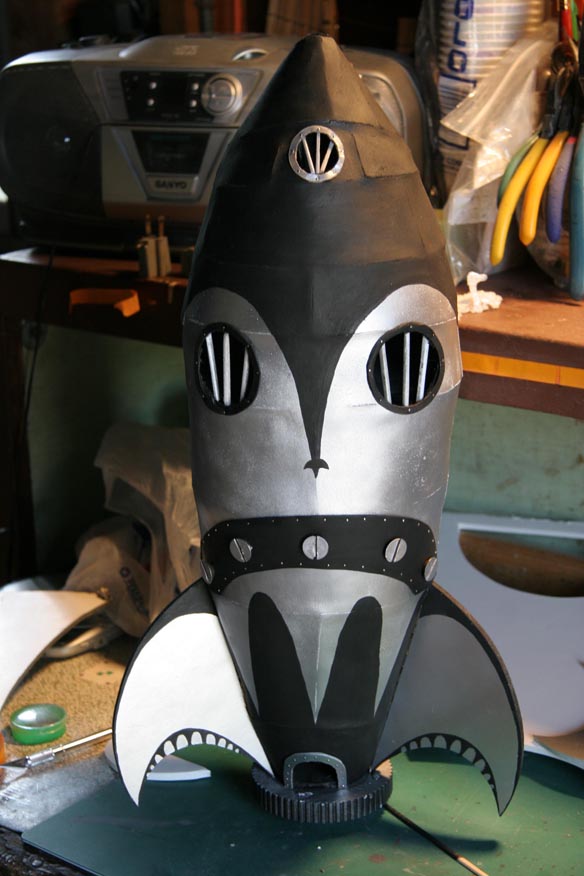
Old "rocket ship jungle gym" pieces like the one above, popular in playgrounds around the late 50's through the 60's, were the source of inspiration for the location of the climax in my film. I tried to base my design on the original so that it could still be identifiable as a "rocket ship jungle gym" but I also took liberties with the design for the functionality it needed to serve in the story.

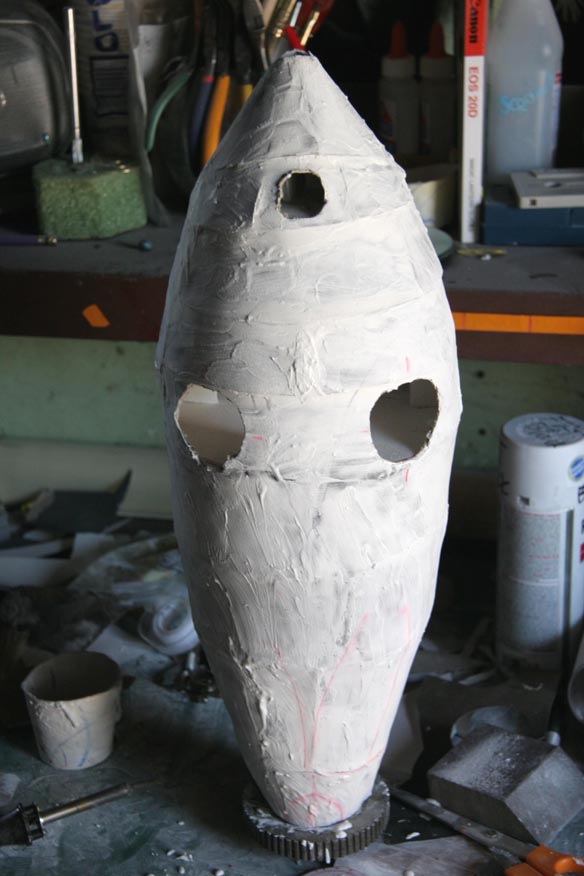
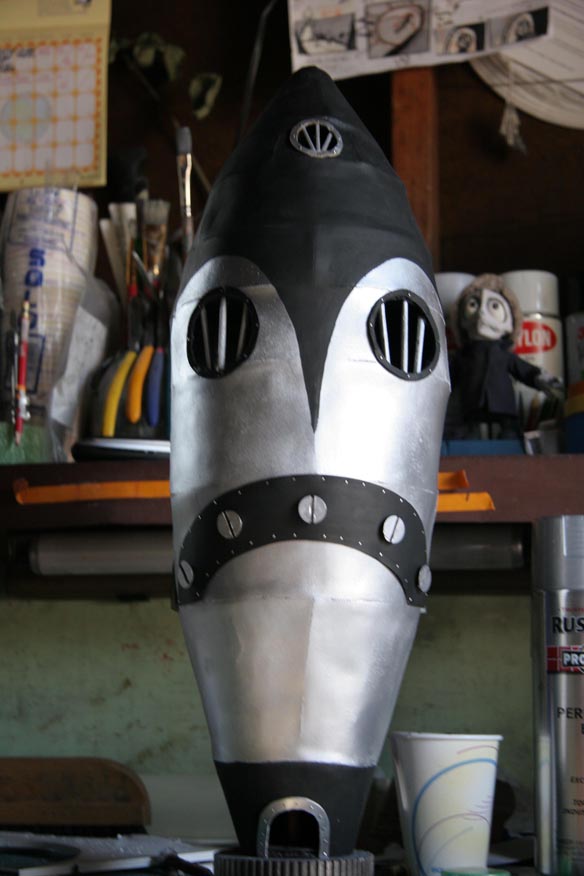
Materials used: Foam board for the interior construction of the rocket and window frames, card stock construction paper for the curved surfaces, spackle for shaping and filling in seams, balsa wood for the bars in the windows, counter sink wood screws for the big bolts in front, push pins for the small rivets, and silver and flat black spray paint.

1. Translate graphite drawings to a working full scale schematic.

2. Construct honeycomb frame for card stock construction paper
to wraparound (based on schematic measurements).


3. Begin to fill in unwanted seams with spackle while using sand
paper to makes edges flush.


4. Paint with flat black to better identify imperfections in 
construction then repeat spackle process.


5. Flat black paint application/spackle process repeated once more.
Window template measured for proper placement.


6. Watered down spackle applied to better identify small 
imperfections.Windows cut out.


7. Final flat black paint applied to rocket.


8. Silver paint applied, window frames applied with push pins.


9. Bars in windows applied as well as "mouth piece" with screws and
additional "rivets."


10. Fins and final painting detail applied.


To be honest I didn't know if this process was going to work but I figured it would be worth a try. Planning definitely helped out as well as following the measurements on the schematic. If your trying to build something, or create anything for that matter, and you find yourself not really knowing where to start, just start with what you know. I knew what I wanted to build based off of my drawings and that informed the steps I took in the construction of the rocket.

Example: Fiddlesticks! I need my rocket to be round but what materials would allow me to do this? Foam board works well for solid rudimentary shapes and card stock construction paper would fit around the form while reinforcing the structure. Yeah that sounds good! But what about gaps? I want a smooth finish. Well spackle is sand-able, maybe I could work with that to get what I want...

Of course it wasn't that simple but this form of planning is an abbreviated version of what I had to think about when building the rocket and it definitely helps when exploring creatively uncharted territories.

-Fonz

3/21/10

Kicking the Bucket


Working under a tight budget? Construction materials for your ideal colossal set piece to expensive? Not enough space to build, work or store large set pieces? Well your not the only one. These are many of the same issues I come up against when trying to recreate scenes set forth in my storyboards/animatic. But of course ideas on paper tend to have a little trouble translating themselves into real-life. In my case I needed a down shot of the Hollow Boy approaching the entrance of a stairwell. The following photos are the steps that I took to create the stairwell using sort of an unconventional object.

Materials used: Foam board for the stairs, aluminum wire for the
stair rails and of course the bucket for the stairwell.

1. The glorious bucket with the Hollow Boy for
size comparison.


2. Roughing out the position of the camera,
doorway and stairs inside the bucket.


3. Setting a reference line where the steps are to
be positioned.


4. Placing steps according to reference line.

 
5. Rough lighting and paint.


 6. Digital paint mock-up.

7. Final wall paint.

 
8. Final floor paint, stair rails and final lighting.

 9. Hollow Boy animation.
(Shot separately and to be scaled down in final scene). 

10. Final scene with stairwell and Hollow Boy digitally composed
in the same frame along with minor cosmetic changes.


So as you can see with a little experimentation and imagination it's possible to get some pretty interesting results just using objects found around the house. It definitely saved me from building a huge set piece that would have had to have been in proportion to the Hollow Boy's actual size. The bucket was the perfect size and shape, it only needed to be scaled up which ended up working perfectly in post.

-Alfonso